Explain the screw tightening torque for Photomicrosensors.
ID: FAQE40023E
update:
Answer
Please refer to each product datasheet for the types of screw and the tightening torque for our Photomicrosensors. Refer to Explanation if there is no description.
Explanation
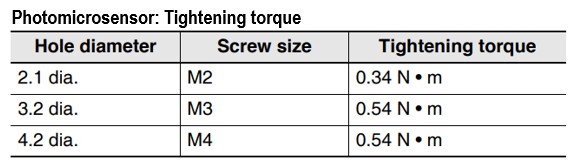
Tighten the screws of built-in type Photomicrosensors using the tightening torque specifications shown below.
Follow the instructions in the datasheet if applicable.
Keep in mind the following when installing Photomicrosensors with screws.
- We recommend using a torque screwdriver that can control the torque.
- Use 3-piece screws (set of screw, spring washer and flat washer).
Using 2-piece screws (set of screw and spring washer) may cause cracks in the screw mounting area. - There should be no cutting oil on the mounting plate.
Using a screw or mounting plate with cutting oil may cause cracks in the screw mounting area. - Prevent stress from being applied to lead terminals of LED/light receiving elements.
In the case of a PCB-incorporated screw-mounting model, elements may be broken due to the load of lead wire or PCB on lead terminals. Prevent stress of more than 4.9 N or higher from being applied to each lead terminal, including instantaneous external force.
For more information, please see "Technical Information for Photomicrosensors"
Quick tips
Screw-mounting connector models are also available in the built-in type Photomicrosensors series.
For details, refer to EE-SX3162/3163/3164-P and EE-SX4162/4163/4164-P.
| Product category | Sensors Photomicro Sensors |
|---|---|
| Classification | Mounting, Storage |
| Related keywords |
|